Easy Old-Fashioned Apple Cobbler: The Secret to Perfect Apples Every Time
There's something uniquely comforting about a warm, bubbling apple cobbler. It evokes memories of cozy autumn evenings, family gatherings, and the simple joy of homestyle baking. While many desserts vie for attention, the classic apple cobbler holds a special place, often requested over even birthday cakes by those who appreciate its rustic charm and heartwarming flavors. But achieving that truly *perfect* apple cobbler – one with tender, sweet-spiced apples and a soft, fluffy topping – can sometimes feel like a culinary quest. Many home bakers have wrestled with dry apples, gummy toppings, or an uneven bake. Fear not, for we're about to unveil the simple yet profound secret that elevates this classic dessert from good to absolutely unforgettable.
The Quest for the Perfect Apple Cobbler: More Than Just Apples and Topping
The journey to an ideal apple cobbler is often paved with good intentions and, sometimes, surprising challenges. While it seems like a straightforward dessert, combining fruit with a simple topping, the nuances can make all the difference. For years, bakers, including seasoned recipe developers, have debated the best approach. Should the apples be sliced or chunked? Does a biscuit-style topping work best, or is a batter more suitable? And perhaps the most contentious question of all: to pre-cook the apples or not to pre-cook?
Extensive testing, involving numerous variations (sometimes as many as nine!), reveals that many common approaches often lead to less-than-stellar results. For instance, a biscuit-style topping, which works wonders for juicy peaches or berries, often falls flat with apples. Apples are naturally less moist, leading to dry, unappealing biscuit variations. Then came the experiments with batter-based toppings. While a step in the right direction, early attempts still presented hurdles. The raw apples, dense and heavy, would often sink into the batter, preventing the dish from baking through properly and resulting in a disappointingly gummy texture. Even keeping butter separate in some batter recipes led to strange, unappetizing craters on the surface. It’s clear that a conventional approach often misses the mark for this particular fruit, proving that what works for one cobbler doesn't necessarily translate to another. The secret, as we'll discover, lies in understanding the unique properties of apples and adjusting our technique accordingly. If you've struggled with these common issues, you're not alone, and the solution is simpler than you think.
Unveiling the Secret: Why Pre-Cooking Your Apples Changes Everything
Here it is: the game-changing technique for an easy old-fashioned apple cobbler that guarantees perfectly tender, flavorful apples every single time. The secret lies in a quick, gentle pre-cook of your apple filling on the stovetop. This isn't just an extra step; it's the foundation of a truly exceptional cobbler.
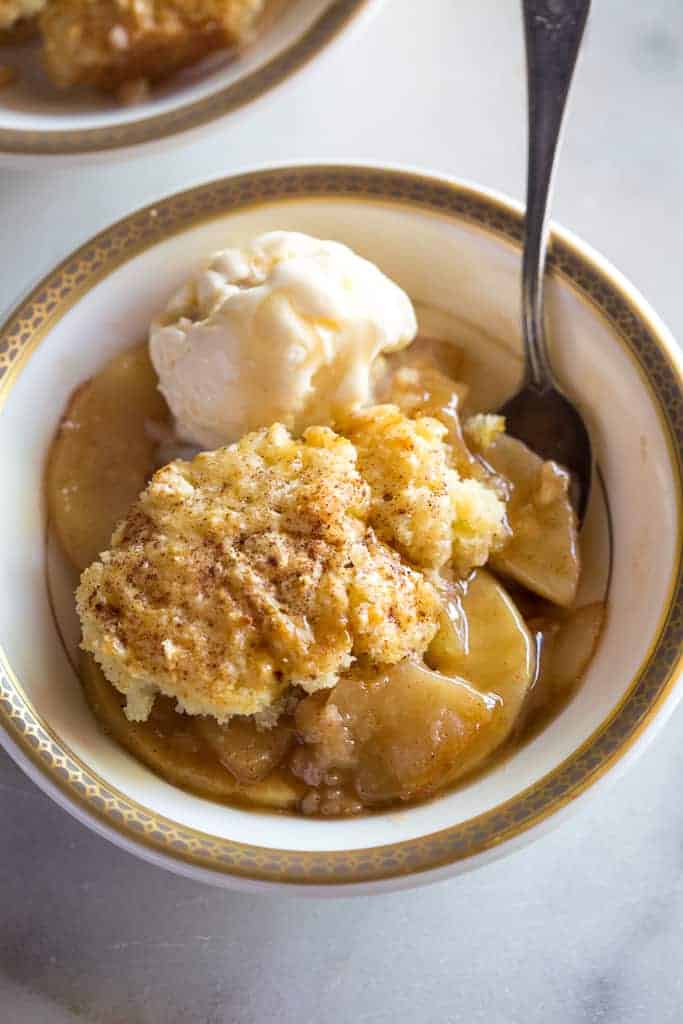
Think about it: raw apples are firm and packed with pectin. If you bake them directly under a topping, they're often slow to soften, release their juices unevenly, and can leave your cobbler filling dry or surprisingly crunchy in places. A few minutes of gentle heat on the stovetop fundamentally transforms them. As the apples cook, they begin to soften, and critically, they start to release their natural juices. This initial release of liquid is vital for preventing a dry filling later on. Moreover, this is your opportunity to perfectly coat those apple slices in a rich, gooey cinnamon-spice brown sugar sauce that will thicken beautifully as it bakes, creating that irresistible syrupy consistency we all crave.
To execute this, start by peeling and slicing your apples. While skipping the peel is an option, most prefer peeled apples in desserts for a smoother texture. For apple varieties, opt for those that hold their shape well and offer a good balance of sweet and tart. Granny Smith apples are a classic choice for their tartness and firm texture, preventing them from becoming mushy. Honeycrisp, Fuji, or Braeburn are also excellent options, providing a delightful crispness and sweetness. Slice them consistently – about ¼ to ½ inch thick – to ensure even cooking. Place your sliced apples in a saucepan with your sugar, spices (cinnamon, nutmeg, a pinch of cloves are excellent), and a touch of butter. Cook them over medium heat for just a few minutes, stirring occasionally, until they've slightly softened and the juices begin to emerge, coating them in that luscious, aromatic sauce. This crucial step gives the apples a head start, guaranteeing they'll be perfectly tender and swimming in a delectable sauce by the time your cobbler emerges from the oven. This small investment of time prevents myriad issues and is truly the
secret to why most apple cobblers fail without pre-cooked apples.
Crafting the Ideal Topping: Batter vs. Biscuit Debate Solved
With the apple filling perfected, the next challenge lies in selecting and mastering the topping. As mentioned, biscuit-style toppings, while fantastic for fruit-forward cobblers with high moisture content like peach or berry, often lead to disappointment with apples. The drier nature of apples simply doesn't provide enough moisture for the biscuits to steam and become tender, resulting in a dense, often crumbly, and dry crust.
This led many intrepid bakers to explore batter-based toppings, a more promising avenue. However, even these required careful refinement. Early batter attempts often placed raw apples on top of a pourable batter, which led to a different set of problems. The heavy apples would sink, preventing the batter underneath from baking through completely, creating a gooey, undercooked layer. The key, it turns out, is to flip the script and ensure your well-prepared apples are nestled at the *bottom* of your baking dish, allowing a carefully crafted batter to rise and bake around them.
The ideal batter for an apple cobbler is one that is simple to prepare – often coming together in a single bowl – and achieves a soft, fluffy texture as it bakes. Unlike some denser batters, this one needs to be light enough to puff up beautifully around the apples, creating a golden-brown crown that contrasts wonderfully with the tender fruit beneath. The beauty of this approach is that the pre-cooked apples provide just enough moisture and structure to support the rising batter, ensuring everything bakes evenly and deliciously. It avoids the gummy texture of underbaked batter and the dryness of an unsuitable biscuit. This synergy between the pre-cooked apples and the right batter is what truly makes for
the only apple cobbler recipe you'll ever need, guaranteeing a consistent, comforting, and utterly delightful result every single time.
Assembling Your Masterpiece: Tips for Cobbler Success
Bringing all these elements together for your easy old-fashioned apple cobbler is straightforward once you understand the core principles. With your sweet-spiced, pre-cooked apples ready, transfer them to your chosen baking dish – a 9x13 inch pan is typically ideal for a family-sized cobbler. Spread the apples evenly across the bottom.
Next, prepare your batter. Most successful apple cobbler batters are a simple combination of flour, sugar, baking powder, salt, milk, and melted butter. Whisk the dry ingredients, then add the wet, mixing just until combined – overmixing can lead to a tough topping. Pour this smooth, pourable batter directly over your apple filling, ensuring it spreads relatively evenly. Don't worry if it doesn't completely cover every apple; it will expand as it bakes.
For that perfect golden finish and extra crunch, you can sprinkle a little coarse sugar or cinnamon-sugar mixture over the top of the batter before baking. This not only adds visual appeal but also a delightful textural contrast. Bake your cobbler in a preheated oven, typically around 350-375°F (175-190°C), for 35-50 minutes. You'll know it's ready when the topping is golden brown, puffed up, and a toothpick inserted into the topping comes out clean. The filling beneath should be bubbling enticingly around the edges.
Allow your cobbler to cool for at least 15-20 minutes before serving. This allows the filling to set slightly and prevents it from being too runny. While it's utterly delicious on its own, a warm slice of apple cobbler reaches peak perfection when accompanied by a generous scoop of vanilla bean ice cream, a dollop of fresh whipped cream, or a drizzle of caramel sauce. Nothing quite says fall better than that first spoonful, a symphony of warm, spiced apples and fluffy topping. For storage, cover any leftovers and refrigerate for up to 3-4 days. Reheat gently in the microwave or oven for that fresh-baked feel.
Conclusion
The journey to the perfect easy old-fashioned apple cobbler doesn't have to be a complicated one. By understanding the unique needs of apples and employing the simple yet powerful technique of pre-cooking them, you unlock a world of tender, flavorful fruit infused with warm spices. Couple this with a thoughtfully crafted batter topping that bakes up light and fluffy, and you've got a dessert that consistently delivers on comfort and taste. No more dry apples, no more gummy crusts – just pure, unadulterated apple cobbler bliss. This proven method eliminates guesswork and ensures that every spoonful is a celebration of home, warmth, and truly perfect apples. Go ahead, give this secret a try, and prepare to elevate your apple cobbler to legendary status in your home!